ZapierでGoogleカレンダーのイベントを取得したい場合、条件を指定して直近のひとつのイベントしか取得できません。複数のイベントを取得する場合は、スクリプトを自分で書く必要があります。
今回はPythonからGoogle Calendar APIを呼んで取得したんですが、OAuth認証で使うアクセストークンの取得などが少し面倒だったので備忘のために手順を残しておきます。各種IDやトークンは適当な文字列にしてあります。
アクセストークンの取得まで
1. クライアントID、クライアントシークレットの作成
- Google Developers Consoleを開いて新しいプロジェクトを作成します
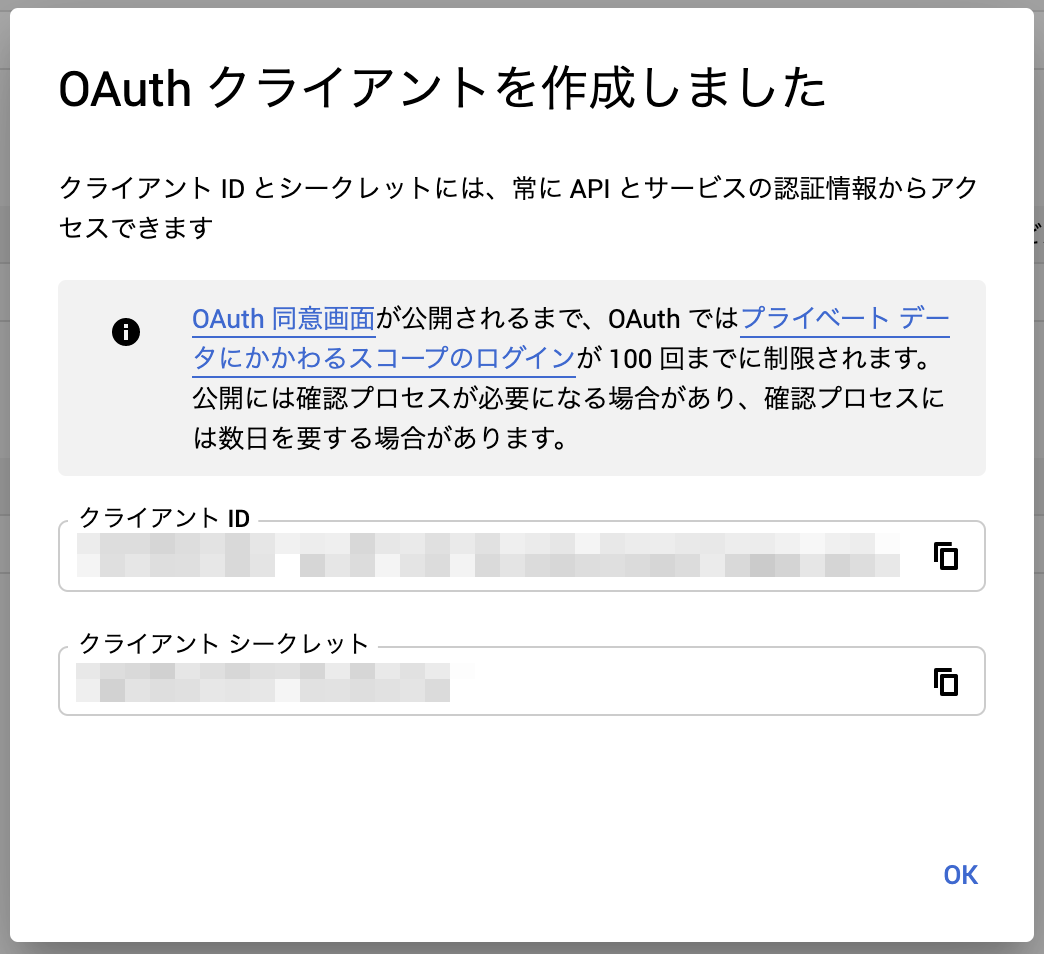
- APIとサービス > 認証情報からOAuth クライアント IDを作成します
- OAuth 同意画面の作成を要求されるので「外部」か「内部」をよしなに指定して作成
- アプリケーションの種類には「その他」を指定
- クライアントIDとクライアントシークレットが表示されるのでメモしておきます

2. ユーザコードの取得
- https://accounts.google.com/o/oauth2/device/code にリクエストしてユーザーコードを取得します
- client_id には1で取得したものを指定
- scopeには allowedscopes の内容を指定(複数の場合はスペース区切り)
❯ curl -H 'Content-Type: application/x-www-form-urlencoded' -d "client_id=1345500758255-cgn9b134661bcclmtgumsarsamdtsdfip.apps.googleusercontent.com&scope=https://www.googleapis.com/auth/calendar" https://accounts.google.com/o/oauth2/device/code
{
  "device_code": "BI-1Np3X1h5mGX8vtjt1jAxxMKzWWhyHMIk7MyRMaq4uHcNe1IKF906DXKM9WhE6mU8g8ufB1YUBZOFdjGwD6LR98FSraC_BOE",
  "user_code": "BME-CBT-BIYX",
  "expires_in": 1800,
  "interval": 5,
  "verification_url": "https://www.google.com/device"
3. デバイスを認証
- 2のレスポンスの verification_url https://www.google.com/device を開いてユーザーコードを入力します

4. アクセストークンを取得
- https://www.googleapis.com/oauth2/v3/token にリクエストしてアクセストークンを取得します
- client_id、client_secret には1で取得したものを指定
- code には2で取得した device_code を指定
- grant_type には http://oauth.net/grant_type/device/1.0 を指定
❯ curl -d "client_id=1345500758255-cgn9b134661bcclmtgumsarsamdtsdfip.apps.googleusercontent.com&client_secret=toOC0AxI6fzZ1FD0aMjse5ky&code=BI-1Np3X1h5mGX8vtjt1jAxxMKzWWhyHMIk7MyRMaq4uHcNe1IKF906DXKM9WhE6mU8g8ufB1YUBZOFdjGwD6LR98FSraC_BOE&grant_type=http://oauth.net/grant_type/device/1.0" https://www.googleapis.com/oauth2/v3/token
{
  "access_token": "yb29.a0Adw1xeVH1RNf-eiZk8XKY4ySlsQipBx7vsjBZZNBbf1cMEIgyisQvzRk8Ox7o0lX5ivAW4kBaad1MpS_edva5mXcA_YAfLOMOC5EidY4QEV82H_OZDbzm_Sbg9iFeDTnKQ96PzwRV9XGeJoYZCa5oRGz6VRSglqFonI",
  "expires_in": 3600,
  "refresh_token": "1//0eBWlfDrPtMruCgYIARAAGA4SNwF-L0IrmZIMmk1IT02MZxXcEEImZYVokvPeHk2GrHNn_WyOQbaiqR8MoquHhjRY0RnoxI0SBy8",
  "scope": "https://www.googleapis.com/auth/calendar",
  "token_type": "Bearer"
Google Calendar APIの呼び出し
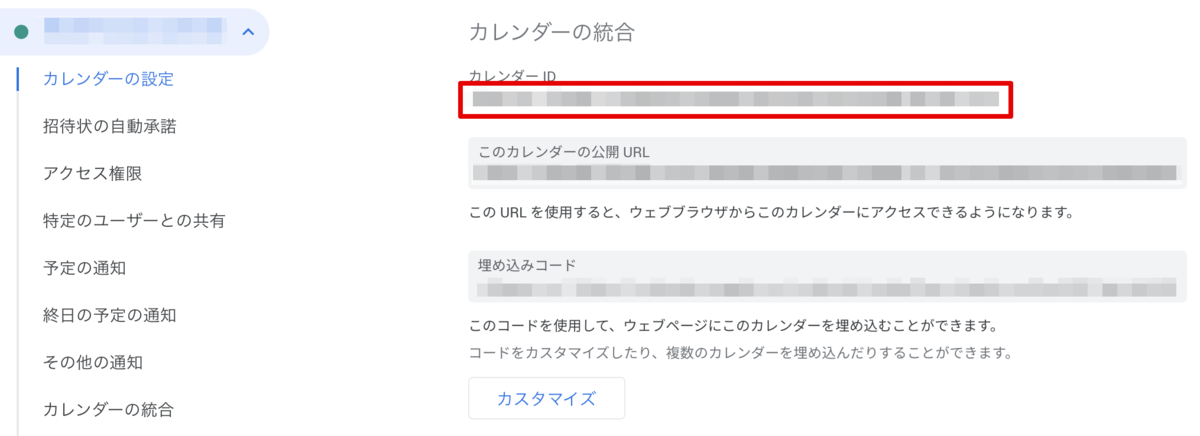
1. カレンダーIDを取得
- 操作したいGoogle CalendarのカレンダーIDを取得します
- Calendarごとの設定画面に表示されています

2. Google Calendar APIを呼び出し
- 前の4で取得したアクセストークンを使ってGoogle Calendar APIを呼び出します
- Google Calendar APIのエンドポイントやパラメータはリファレンス を参照
- 今回はイベントの取得なので
GET /calendars/calendarIdを利用
- 呼び出してみるとエラーになるはずです
❯ curl 'https://www.googleapis.com/calendar/v3/calendars/hoge.com_9ui0d329anigf4t56mspgmeopk@group.calendar.google.com/events?singleEvents=true&orderBy=startTime&timeMin=2019-10-01T00%3A00%3A00.000Z&timeMax=2020-03-31T00%3A00%3A00.000Z&showDeleted=false&showHiddenInvitations=false&q=hogehoge&&access_token=yb29.a0Adw1xeVH1RNf-eiZk8XKY4ySlsQipBx7vsjBZZNBbf1cMEIgyisQvzRk8Ox7o0lX5ivAW4kBaad1MpS_edva5mXcA_YAfLOMOC5EidY4QEV82H_OZDbzm_Sbg9iFeDTnKQ96PzwRV9XGeJoYZCa5oRGz6VRSglqFonI'
{
 "error": {
  "errors": [
   {
    "domain": "usageLimits",
    "reason": "accessNotConfigured",
    "message": "Project 1045900338247 is not found and cannot be used for API calls. If it is recently created, enable Calendar API by visiting https://console.developers.google.com/apis/api/calendar-json.googleapis.com/overview?project=1045900338247 then retry. If you enabled this API recently, wait a few minutes for the action to propagate to our systems and retry.",
    "extendedHelp": "https://console.developers.google.com/apis/api/calendar-json.googleapis.com/overview?project=1045900338247"
   }
  ],
  "code": 403,
  "message": "Project 1045900338247 is not found and cannot be used for API calls. If it is recently created, enable Calendar API by visiting https://console.developers.google.com/apis/api/calendar-json.googleapis.com/overview?project=1045900338247 then retry. If you enabled this API recently, wait a few minutes for the action to propagate to our systems and retry."
 }
}
- extendedHelp に表示されてるURLにアクセスしてAPIを有効化してからもう一度実行すると成功し、カレンダーのデータを取得できます

3. リフレッシュトークンを使ったアクセストークンの更新
❯ curl -X POST -d "client_id=1345500758255-cgn9b134661bcclmtgumsarsamdtsdfip.apps.googleusercontent.com&client_secret=toOC0AxI6fzZ1FD0aMjse5ky&refresh_token=1//0eBWlfDrPtMruCgYIARAAGA4SNwF-L0IrmZIMmk1IT02MZxXcEEImZYVokvPeHk2GrHNn_WyOQbaiqR8MoquHhjRY0RnoxI0SBy8&grant_type=refresh_token" https://www.googleapis.com/oauth2/v3/token
{
  "access_token": "ye29.a0Adw2xeVwlsHKeNjICE7ndxQk_HF3FLNiJG0dlBgKSDBn4hBBREpppAZ-ZX9jDpXksYOkwE9DJZnAElbDwJ3kh8qYLIBwSZWXOrbUYHHE0O-tdFLRIsqqYAZRpUP7-Gx27rZ_ntiSttgWkmh4eccj8Ky975pVF9LZFDY",
  "expires_in": 3599,
  "scope": "https://www.googleapis.com/auth/calendar",
  "token_type": "Bearer"
ZapierのPythonスクリプト作成
- ある文字列が含まれる特定の日のイベントを取得する例です
- Zapierのスクリプトなのでベタッと書いてます
import json
import urllib.request
import urllib.parse
import urllib.error

def load_refreshed_access_token(client_id, client_secret, refresh_token):
    """リフレッシュトークンを使ってアクセストークンを取得する
    :param client_id: (str) クライアントID
    :param client_secret: (str) クライアントシークレット
    :param refresh_token: (str) リフレッシュトークン
    :return: (str) アクセストークン文字列
    """

    # curlコマンド例
    # curl -X POST -d 'client_id={client_id}&client_secret={client_secret}&refresh_token={refresh_token}&grant_type=refresh_token' https://www.googleapis.com/oauth2/v3/token
    url = 'https://www.googleapis.com/oauth2/v3/token'
    data = {
        "client_id": client_id,
        "client_secret": client_secret,
        "refresh_token": refresh_token,
        "grant_type": "refresh_token",
    }
    headers = {
        'Content-Type': 'application/json',
    }

    req = urllib.request.Request(url, json.dumps(data).encode(), headers)
    try:
        with urllib.request.urlopen(req) as res:
            body = res.read()
            body_json = json.loads(body.decode('utf-8'))
            return body_json['access_token']
    except urllib.error.HTTPError as err:
        print('[Error occurred] code:' + str(err.code) + ', reason: ' + err.reason)
    except urllib.error.URLError as err:
        print('[Error occurred] reason:' + err.reason)


def load_events(cal_id, token, time_min, time_max, query):
    """指定のカレンダーのイベントを取得する
    :param cal_id: (str) Google CalendarのID
    :param token: (str) アクセストークン
    :param time_min: (str) 開始日時 ex)2019-08-22T00%3A00%3A00.000Z
    :param time_max: (str) 終了日時 ex)2019-08-23T00%3A00%3A00.000Z
    :param query: (str) 検索文字列
    :return: (str) レスポンスのjsonオブジェクト
    """

    # curlコマンド例
    # curl 'https://www.googleapis.com/calendar/v3/calendars/{cal_id}/events?singleEvents=true&orderBy=startTime&timeMin=2019-08-22T00%3A00%3A00.000Z&timeMax=2019-08-23T00%3A00%3A00.000Z&showDeleted=false&showHiddenInvitations=false&q=hogehoge&access_token={access_token}'
    url = 'https://www.googleapis.com/calendar/v3/calendars/' + cal_id + "/events"
    params = {
        'singleEvents': 'true',
        'orderBy': 'startTime',
        'timeMin': time_min,
        'timeMax': time_max,
        'showDeleted': 'false',
        'showHiddenInvitations': 'false',
        'q': query,
        'access_token': token,
    }

    req = urllib.request.Request('{}?{}'.format(url, urllib.parse.urlencode(params)))
    try:
        with urllib.request.urlopen(req) as res:
            body = res.read()
            body_json = json.loads(body.decode('utf-8'))
            return body_json
    except urllib.error.HTTPError as err:
        print('[Error occurred] code:' + str(err.code) + ', reason: ' + err.reason)
    except urllib.error.URLError as err:
        print('[Error occurred] reason:' + err.reason)

# Zapierから渡されるパラメータの取得
# input_data = {
#     'client_id': '1345500758255-cgn9b134661bcclmtgumsarsamdtsdfip.apps.googleusercontent.com',
#     'client_secret': 'xxxx',
#     'refresh_token': 'yyyy',
#     'year': '2020',
#     'month': '3',
#     'day': '18',
# }

client_id = input_data['client_id']
client_secret = input_data['client_secret']
refresh_token = input_data['refresh_token']
year = input_data['year']
month = input_data['month']
day = input_data['day']

# アクセストークンの取得
access_token = load_refreshed_access_token(client_id, client_secret, refresh_token)

# 特定の日のイベントのロード
date_str = year + '-' + month.zfill(2) + '-' + day.zfill(2)
result = load_events(
    'hoge.com_4e3lpugvcleelv0igmhi396ocg@group.calendar.google.com',
    access_token,
    date_str + 'T00:00:00.000Z',
    date_str + 'T23:59:59.000Z',
    'hogehoge'
)

# 文言の組み立て
items = result['items']
summary_text = '本日 ' + date_str + ' のhogehogeイベント数は ' + str(len(items)) + ' です'
print(summary_text)

# Zapierの返り値にセット
output = {'summary_text': summary_text}
いつか誰かの役に立ちますように。もちろん自分も含めてね。
ちゃんとブログか何かにまとめておけばよかったと思いながら1年前にやったことのメモを見ながらもっかい調べてる
— こにふぁー (@konifar) 2020年3月18日